Thursday, December 28, 2017
Paperfox FSD-1 taper applicator prototype with a stepper motor
The Paperfox FTD-1 tape applicator with conveyor belt is a successful product, but it needs compressed air. Now we created a tape applicator head with an electric stepper motor so the tape applicator can be used without compressed air.
Unfortunatelly the stepper motor is bigger than a pneumatic cylinder so this new tape application head needs more space than the pneumatic version.
Wednesday, December 13, 2017
Paper drill
We have manufactured a simple paper drill machine again.
 The device is based on a cheap drilling machine, the waste paper is ejected through a side whole of a special insert.

Saturday, October 21, 2017
Label applicator prototype
We have manufactured a prototype for applying self adhesive labels on a sheet of cardboard.
This labeling device based on the conveyor belt of the FTD-1 tape applicator.
The labeling heads are driven by a stepper motor so the device not needs compressed air for the operation.
Friday, October 6, 2017
Paperfox MPR-4 curtrain grommet machine
You can attach 40mm grommets to cutrain, textile drapery, truck canvas with this useful pedal operated device.
IPEX-2017
The print industrys event IPEX will take place in Birmingham again from 31. October.

Paperfox will exhibit die cutters, papaper punches at the stand nr.: N300L

Paperfox will exhibit die cutters, papaper punches at the stand nr.: N300L
Tuesday, August 29, 2017
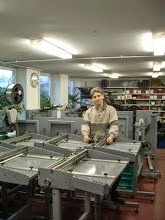
New improvements of FTD-1 Tape applicator
The Paperfox FTD-1 Tape applicator is a very popular new development from Paperfox.
This device is very versatile so we received several customer ideas to make the machine even more capable of doing more tasks.
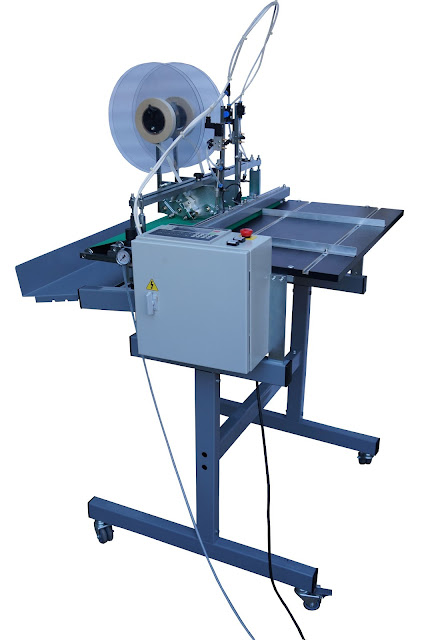

The old round belt transmission injured sometimes during delivery so we changed it to a more comact geared motor transmission.

At the early versions of Paperfox FTD-1 tape applicator the optosensor was fixed on a TD-1 tape applicator head. This was quite easy to use and easy to adjust, but had some limits: If the sheet on which the tape should be placed is not rectangular (for example: die cutted boxes) then the position of the optosensor often should be replaced.
Now we mounted the optosensor on a slider so you can move it in cross direction. The longitudinal position can be compensated with the digital controller.

The slider for the optosensor can be used for fixing other elements (paper guides, other type of optosensor...) as well. We fixed two aditional paper guide to ensure the smooth movement of the paper under the applicator heads.

Now you don't have to calculate the proper delays, you can set the tape laying positions in millimeters.

The delay time due to the position of the optosensor can be set digitally, you don't have to adjust the optosensor mechanically into the proper position.

Up to 10 program can be stored into the programming unit.

This device is very versatile so we received several customer ideas to make the machine even more capable of doing more tasks.

Summay of improvements:
1. Gear motor

The old round belt transmission injured sometimes during delivery so we changed it to a more comact geared motor transmission.
2. Optosensor

At the early versions of Paperfox FTD-1 tape applicator the optosensor was fixed on a TD-1 tape applicator head. This was quite easy to use and easy to adjust, but had some limits: If the sheet on which the tape should be placed is not rectangular (for example: die cutted boxes) then the position of the optosensor often should be replaced.
Now we mounted the optosensor on a slider so you can move it in cross direction. The longitudinal position can be compensated with the digital controller.
3. Additional paper guides

The slider for the optosensor can be used for fixing other elements (paper guides, other type of optosensor...) as well. We fixed two aditional paper guide to ensure the smooth movement of the paper under the applicator heads.
4. Teflon coated rollers

The sticky side of double sided self adhesive tapes can contaminate the guiding rollers. We've put feflon surface on the rollers to eliminate this issue.
5. Software improvements
Now you don't have to calculate the proper delays, you can set the tape laying positions in millimeters.
The delay time due to the position of the optosensor can be set digitally, you don't have to adjust the optosensor mechanically into the proper position.

Up to 10 program can be stored into the programming unit.

... and this is still not the end. Please do not hesitate to contact me if you have any idea about the improvement of this device.
Wednesday, July 5, 2017
How to repair a business card slitter?
The most common failure of business card slitters, that the spindle (1) curves and the movable knife (3) jumps to the other side of the fixed knife (2). This is happens usually because a too heavy cardboard sheet (6) or if there are more sheets forwarded into the machine.


The solution of this problem is not so easy: If you reposition a knife to the original position the springs (4) pushing the other knives out of the proper position.
I show a possible solution for this problem on a Cyklos visit card slitter. (The other visit card slitters are usually similar.)
If you disasamble the knife block you can remove the movable knives to the desired position.

You can fix the movable knives in this position with a piece of nut or bolt as in the photo.

Assamble the knife block, remove the nuts and you can use your favourite visit card slitter with great joy.
Sunday, May 14, 2017
What are the size and position limits of the Paperfox die cutters?
Paperfox presses are great devices for die cutting and punching, if the size and position of the shape to be cut is consistent with the capabilities of the machine. It is an often asked question that which Paperfox device able to cut the desired shape, so I try to describe the most important datas.
The Paperfox MP-1 press is suitable to use with 60x30mm punch tools and the edge of the sheets can extend beyond 10mm to the punch tool as shown in the figure below.
The Paperfox MP-1 press is suitable to use with 60x30mm punch tools and the edge of the sheets can extend beyond 10mm to the punch tool as shown in the figure below.

Unfortunately, the whole 60x30mm size can not be used for punching, because the distance between the cutting rules and the edge of the tool body should be at least 2-4mm, and the position of the screws (the gray circle in the picture below) can not be used for punching.

If you don't fix the tool and the cutting plate with screws and secure them with a double-sided adhesive tape, you can die cut also at the position of the screws. If you need a larger punch tool, a larger, customised additional plate, similar to the one shown on the image below, can help.

This cutting plate makes possible to use even 60x140mm tools with the MP-1.


Do you need more? The customised machine-monster on the picture bellow can punch even at 20cm distance from the edge of the sheet!

The KB-32 Combined punching and creasing machine has similar die cutting tool and cutting plate to the MP-1, but the original creasing tool can be replaced with a die cutting tool and the device cna punch anywhere on the maximum 380mm wide sheets.

Although in the KB-32 can be mounted with up to 380x60mm die cutting tool, it is recommended to use only up to 140x60mm tools because of the limited rigidity of the device. The cutting rules can not be closer to the edges of the tool body at 2-4mm, and you can not use the position of the fixing screws for die cutting as it shown in the picture below.
You can try using longer punch tools, but the result is not guaranteed. If necessary, up to 140x100mm tool can be mounted into the press with the individual additional plates as shown in the figure below.

If the maximum 380mm width of KB-32 is insufficient, a similar device up to 70cm width can be made.

If the desired punching can not be done on the Paperfox presses, a Paperfox cylinder die cutter can be the solution to use up to 700x860mm die cutting tools.
Thursday, March 2, 2017
Die cutting with a transparent die cutting tool
The Paperfox KB-32 die cutter is a really versatile device, you can crease, die cut and punch with it.
With some modification as in the picture bellow you can die cut even 9x12cm products.

- 2 pcs 10x14cm steel plate mounted into the device
- The M8 screws at the right side of the picture are changed for longer ones
- The spring and the pressing bar also should be changed
- We equipped the device with a setting screw (left side of the picture) to limit the pressing force
 |
| With this setting screw you can limit the cutting force |
The mayor davantage of the transparent die cutting tool, that you can adjust the cutting lines to the printed elements.

Place a cutting plate under the sheet to be cut, put the tool on the sheet and position the tool to the printed elements. Place all together into the die cutter and cut it.

There are no ejecting rubbers in the tool so you can see the printed elements well. There is a hole on the tool so you can remove the cutted paper manually from the tool.

Saturday, February 18, 2017
What kind of double sided adhesive tape can be used in Paperfox tape applicators?
The Paperfox TD-1 tape applicator head is an affordable device for placing double coated pressure sensitive adhesive tape on paper cardboard plastic foil or other sheet materials but the usage of this useful device has some limits.

The other limit is the material of the tape.
To understand this limit let's have a look at to the construction of the double coated pressure sensitive adhesive tapes.
The construction of the double coated pressure sensitive adhesive tapes.

Release liner
The white paper strip on the photo is the release liner. Release liners are usually paper coated on booth sides with silicone layer.The width of the liner is usually the same as the width of the adhesive coated carrier, but the so called "finger lift" tapes having extended liners to make the manual removal of the release liner easier.
Paperfox tape applicators can applicate tapes only with easy to tear thin paper release liners. (Fortunately the most release liner is easy to tear)
Backing or carrier
The transparent strip is the backing or carrier coated on booth sides with adhesive layer. The carrier can be different:- acrylic film
- other plastic film
- felt or non-woven tape
- paper
- foam materials
- etc...
Paperfox tape applicators can applicate tapes only with easy to tear carrier such as paper, felt or non-woven tape.
Adhesive
There are different adhesives used. Rubber based adhesives are having a high initial strength so they sticking to the paper quickly providing a stabile workflow. Unfortunately if you keep this kind of tapes long on stock it loses the quality don't sticks well the tape application can be unstable.
Acrylic adhesives having weaker initial strength but the quality is more stabile and having better environmental (temperature, chemical...) resistance.
Tear test
The easiest way to determine if the tape can be used in Paperfox TD-1 Tape applicator is to test. Try to tear the tape.

Breaks easily as the white tape on the photo, then it can be used. If the backing material is stretches and hard to tear then maybe that the tape applicator head can't cut the tape well.
If the tape is old and there are gaps between the turns then the glue maybe dry and don't sticks to the paper well. In this case the tape application can be stopped.
What if the tape sticks "too good", and it sticks to the guiding elements of the tape applicator?
In this case you can put a drum sanding cylinder on the guiding screw as in the picture below.

Wednesday, January 11, 2017
Why slippage occurs in cylinder die cutters?
Flatbed die cutter cut the full size of the sheet simultaneously. The cylinder of the cylinder die cutters roll above the material to be cut and the cutting made under the cylinder.

1. Die board
2. Steel rule die
3. Cylinder
4. Material to be cut
5. Section under cutting
Unfortunately, the cutting happens not at one point, but beside the cylinder a few millimeters.
Consequently the cutting force (F) is not perpedicular to the surface there is a longitudinal component (F2) as well. This force causes the longitudinal sliding effect of the sheet to be cut in cylinder die cutters.
This sliding effect and inaccuracy depend on
- the thickness of the material to be cut
- the material of the sheet to be cut
- the diameter of the cylinder
- the angle of the tool and cylinder
- a lot of other circumstances
Subscribe to:
Posts (Atom)